iphone

The New MacBook Pro!!

NEW MACBOOK PRO

macbook pro.png

Apple's hugely hyped product announcement on October 27th gave us a mixed bag of good and bad. The bad first: If you have been waiting for updates to iMacs, MacPro's, MacMini's and/or iPads you will be disappointed. Apple did not update any of these products. What doesn't disappoint however is the brand spanking new, cutting edge MacBook Pro's that Apple announced. 

Touch Bar
Apple has completely revamped their flagship laptops - removing the function keys and giving them a "Touch Bar" that interacts with the screen, allowing Touch ID and direct interaction with on screen software that can take advantage of the technology. It's Apple's belief that most folks don't use the function keys as designed anyway!

Hardware and Connectivity
These new laptops also sport a much lighter, thinner form factor, wider gamut retina display, and a substantial overall boost in the hardware that affects speed and performance. Apple once again leads the "let's change the connections" charge - they have removed all ports except 4 USB-C and one headphone jack. This will require the purchase of adapters IF you plug in current hardware such as an external mouse, hard drive, display or keyboard. But USB-C allows for charging, display output, fast data transfer of connected drives, and connecting just about anything else with the right adapter(s).

Price
And one more thing... all this comes with a hefty price increase - the starting point for a 13" MacBook Pro is $1799 and $2399 for the 15" - Wow!! Since my current laptop is over 6 years old, I will most likely be ordering one of these laptops before the end of the year but for now here is a great article from CNET about the new machines.


UPGRADES: YES OR NO?

Mac OS Sierra - DO NOT INSTALL
It is currently a "hold off, please do not install" - why?? Sierra is shaping up to be a very good OS upgrade BUT as always until it has been out awhile, we recommend holding off on installing it so the third party peripheral and software manufacturers can catch up. Right now there are documented issues with ScanSnap products, some Quicken versions, Adobe CC, and so forth. This is normal and not unexpected. We fully expect to be giving a green light on Sierra before the end of the year. Apple's Photos 2.0 (only available in Sierra) is great and I too am anxious to get working with it. Patience will serve us well. 


iOS 10  
I am giving iOS 10.0.2 a 'GO' for installing. This update has some fun new features which John mentions below and a complete list is available here. As always be sure you backup your iPhone completely before you upgrade. 

ALSO - be sure your iOS device can run iOS 10 and remember IF your device is more than a year or two old, any new OS will run slower. Apple increases the hardware requirements every time they release a major update. 


TECH TIPS
 

iPhone / iPad - iOS

Did you know that every time you open an App on your iPhone/iPad it stays open and running in the background until you quit it? All these running programs take up battery life and processor time so quit them often!

Here's how:

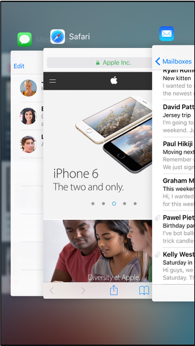
  • Double-click the Home button. This will bring up the Multitasking Screen showing you all the applications that are currently running (see screen shot to the left).
  • Swipe Up on the page icon for any open App and slide it off the screen to close it completely. 
  • You can swipe across your screen to see all your open Apps or quickly switch to a different App by tapping its page icon.


macOS - Yosemite (10.10.5 and later)

If you have heard me speak about the Mac over the last few years, you will know I have an issue with Apple's interface redesign that hides buttons until you mouse over them.

When Apple released Yosemite, they removed the button that gave us access to the address book / contacts for emails... Grrrrrrr.... But lo and behold what I didn't discover until much later is that the access to your Contacts is still there - it's just hidden until you place your cursor on the To:, Cc:, or Bcc: line as if you were going to type. If you look to the far right of this line, you will see a tiny blue + sign (see screen shot to the right). When you click it, you will see your Contacts list like this - you can access your groups and contacts from here. Click on a name and the screen slides down slightly and you can click on the email address to add it as a recipient.

How to Use THE FINDER

BACK TO BASICS

One of the great benefits of my job is that I get to look toward new technology, but sometimes we need to be reminded that not all computer users have the same skill set. Our clientele varies from folks who are learning to navigate email and the web, to business professionals who rely on their computers day in and day out. This fact is also what makes this business so interesting. Since school starts this month, it is the perfect time to introduce a new section to this newsletter: "Back to Basics". I hope you like it!

THE FINDER - WHAT IT CAN DO FOR YOU!!  

The Finder starts up automatically when you first open your computer - its interface encompasses your desktop, the menu bar and the dock among other things. 

The smiley face icon appears in the dock and all your desktop files appear. Within a few more seconds, any extra programs that need to start up do so and sometimes their icons appear on the Apple Menu bar or in the dock. When I teach classes  I tell my students to think of the Finder as their secretary. 

It can open a window, create a folder, file that folder, and take out or empty the trash. But it can do so much more! (This article is excerpted from Apple's Knowledge Base.)

Open Windows and Files
To open a window and see the files on your Mac, switch to the Finder by clicking the Finder icon (pictured above) in the Dock. Switching to the Finder also reveals any Finder windows that might be hidden behind the windows of other apps.

When you see a document, application, or other file that you want to open, just double-click it.

L - R: icon view, list view, column view or cover flow

L - R: icon view, list view, 
column view or cover flow

Change how files are viewed in windows
Once a window is open, you can decide how to view the files that appear. If you prefer to view your files as an alphabetical list instead of as icons, choose View > as List from the Finder menu bar, or use the View buttons at the top of the window. 

Use the Sidebar in Windows
The sidebar in Finder windows contains shortcuts to some of Apple's recommended options, your Favorites, devices such your hard drives, and more. Like items in the Dock, items in the sidebar open with just one click.

To change the items in your sidebar, choose Finder > Preferences from the Finder menu bar, then click Sidebar at the top of the preferences window. You can also drag files into or out of the sidebar.


USE FOLDERS

To Create a folder:

  1. Click where you want the folder to appear, such as on the desktop or in another window.
  2. Choose File > New Folder from the Finder menu bar.
  3. This works for folders, not documents. To create a document for use in a particular app, open that app, then use its File menu to create a new document.

To move a folder or file into another folder:

  1. Drag the item onto the closed folder.
  2. Or double-click the folder to open it, then drag the item into the folder window.

To change the name of a folder:

  1. Click the folder once to select it.
  2. Press the Return key on your keyboard, type a new name, then press Return again.

Some folders can't be renamed including these:

  • Applications: Your apps (programs) go in this folder.
  • Desktop: Your Desktop folder and your desktop provide two ways of viewing the same files, so anything that you put in the Desktop folder also appears on your desktop.
  • Documents: When you use an app to create and save a new document, the app might save your document here. You can save documents wherever you want, or move them to other folders after saving them.
  • Downloads: Safari and other apps save downloaded files to this folder.
  • Music, Pictures, and Movies: Some apps store their libraries of music, pictures, or other media in these folders, though the items in a library might be available only within its app. For example, to see the pictures or movies you imported into Photos, open the Photos app.
  • Other folders that come with your Mac

TECH TIPS

MAC OS: Print to PDF

I often get asked how to share a document created on a Mac with others OR how to create a printout of a web page or other hard to print item. Apple has provided the solution via the Print to PDF option available right in the Print dialog:

  • Open the document, web page, or file you want to print to a PDF
  • Click the File menu and select "Print", or just hit Command+P
  • Look for the "PDF" button in the lower left corner, click on that pull-down menu, and select "Save as PDF"
  • Click "Save" in the save dialogue box, and save the file to whatever location you want (Documents is default).

Locate the resulting document in the Finder or with another app; it'll appear as a unique PDF file, and no, it will not overwrite or alter the origin file it was created from. You will notice there are many other options (what you see will vary based on installed software). 

What I love most about this method is that if you are trying to print something like a web page that isn't behaving, once you turn it into a PDF you can then choose what pages to actually print OR even better, simply store the PDF on your computer and save ink and the trees!  Try it and let me know how you like it!

iPhone / iPad Tip- from newsletter reader Dick G:

Dick travels a lot and needs to take his medications with him - this is a great solution to how to carry all your medication documentation in a compact format (I'm quoting Dick below): 

  1. I just used an Aspirin bottle to illustrate here but a prescription bottle, properly framed in the viewfinder and held steady will yield a perfectly useful copy of the important information on each prescription product you use. 
  2. You could also email that photo to a pharmacy if that became necessary. I also photograph the actual document that comes with the prescription. On my iPod phone it is secure and very convenient.

NOTE: A big issue is to properly frame and focus the camera on the close up exposure. It is pretty simple. This was a flash exposure taken on a piece of printer paper for a background. I sense that officials are becoming more concerned for traveling with meds without proper accompanying prescription documentation.